QQ上黏黏的小红点很好玩有木有,于是自己也想实现一番,看到iOS实现的人比较少,Android的比较多,于是这个就用iOS来实现哈~
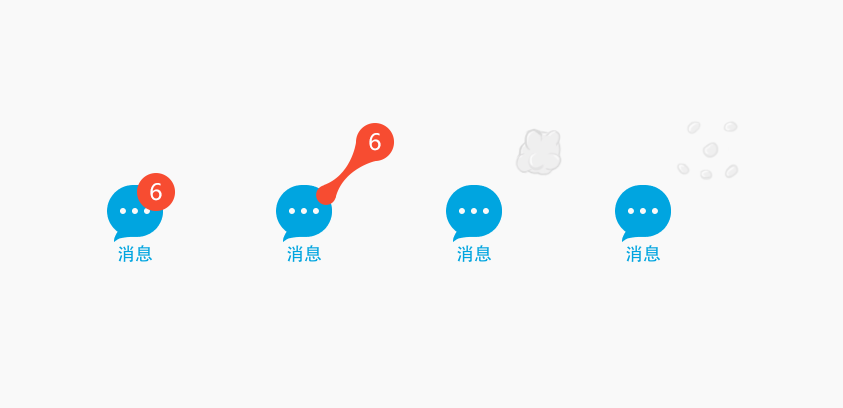
效果图:

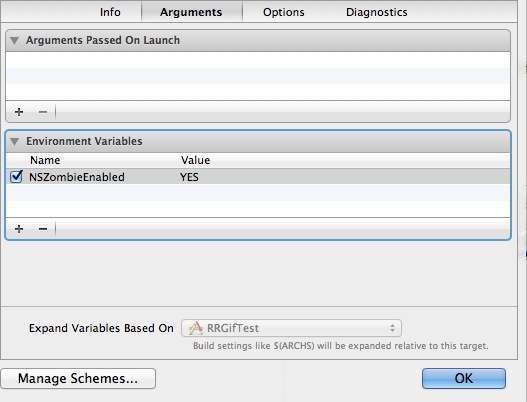
调试图:
其实从实现来讲,我是先实现第二张图的效果的。
武林网小编给大家说下实现思路
1.了解原理,以及如何绘制“黏黏”形状(即绘制两圆加两条贝塞尔曲线)。
2.新建UIView(AZMetaBallCanvas),作为单独画布用来绘制“黏黏”形状,用程序实现算法,并绘制出来。
3.给画布(AZMetaBallCanvas)添加attach:(UIView *)方法,并添加手势监听,重绘,使得任意 view 都能够被在画布上拥有“黏黏”效果。
4.根据连心线的距离加上判断是否要断开,用户手指离开时也要根据距离来判断是爆炸动画还是回弹动画。
详细过程
首先必须要了解小红点拖拽的过程形状是什么,其实就是类似元球效果(MetaBall)。仔细观察可分析发现,就是两个大小不一样的圆加上两条贝塞尔曲线构成的。
关于算法部分,我已经分解成了另外一篇博文,强烈建议不清楚该形状是怎么画出来的同学先看一下《【算法分析】QQ“一键退朝”之详细计算方法》
1.绘制拖拽
既然怎么求坐标点画出来我们已经知道了,现在就可以去实现了。
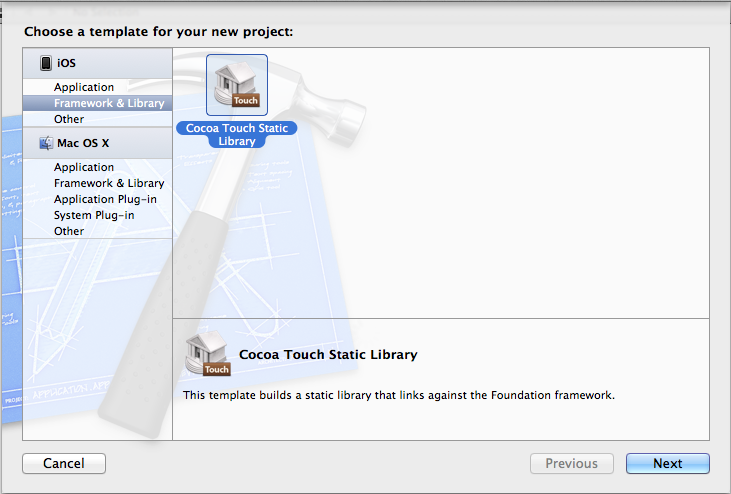
首先新建一个“画布”,继承自UIView
//AZMetaBallCanvas.h@interface AZMetaBallCanvas : UIView@property(nonatomic,strong) Circle *centerCircle;@property(nonatomic,strong) Circle *touchCircle;@end
Circle为自定义实体类,里面定义了一些圆的基本属性,如圆心坐标、半径等。
为什么要新建一个画布?
因为小红点是能够全屏拖动的,别看QQ上它存在某一行Cell,但其实你可以把它拉到别的Cell上去,这就需要给小红点足够的位置来绘制,就干脆新建一个画布专门用来绘制小红点的动作好了。
AZMetaBallCanvas目前包含两个属性,两个圆,一个中心圆,一个触摸圆,按照需求来看,中心圆应该是位置不变的,触摸圆会跟随手指触摸屏幕的位置而改变,后面需要在两个圆之间画上贝塞尔曲线来构成元球效果。
接下来开始写AZMetaBallCanvas的实现
//AZMetaBallCanvas.m#define RADIUS 40.0@interface AZMetaBallCanvas() {UIBezierPath *_path;CGPoint _touchPoint;}@end@implementation AZMetaBallCanvas- (instancetype)initWithCoder:(NSCoder *)aDecoder {self = [super initWithCoder:aDecoder];NSLog(@"initWithCorder");if (self) {[self initData];}return self;}- (void)initData {_touchCircle = [Circle initWithcenterPoint:self.center radius:RADIUS];_centerCircle = [Circle initWithcenterPoint:self.center radius:RADIUS];_touchPoint = self.center;NSLog(@"self.center (%f, %f)", self.center.x, self.center.y);}@end先初始化两个圆的位置,默认在View的中心,并在init、initWithFrame、initWithCoder等父类构造函数中加入自定义初始化方法initData。
重写绘制方法
如同Android中的onDraw(),iOS中的drawRect能够被重写绘制,然后调用[view setNeedsDisplay]来通知重绘。
- (void)drawRect:(CGRect)rect {_path = [[UIBezierPath alloc] init];[self drawCenterCircle];[self drawTouchCircle:_touchPoint];[self drawBezierCurveWithCircle1:_centerCircle Circle2:_touchCircle];}如同算法分析中所讲,在绘制的时候,我们只需要绘制两个圆(drawCenterCircle、drawTouchCircle)和连接两圆的贝塞尔曲线(drawBezierCurve),算法其实就是照抄《【算法分析】QQ“一键退朝”之详细计算方法》
iOS自带贝塞尔曲线UIBezierPath,其自带画圆方法addArcWithCenter: radius: startAngle: endAngle: clockwise:,所以我们只要调用就好啦!
#pragma mark draw circle --- 画圆- (void) drawCenterCircle {[self drawCircle:_path circle:_centerCircle];}- (void) drawTouchCircle:(CGPoint)center {_touchCircle.centerPoint = center;[self drawCircle:_path circle:_touchCircle];}- (void)drawCircle:(UIBezierPath *)path circle:(Circle *)circle {[_path addArcWithCenter:circle.centerPoint radius:circle.radius startAngle:0 endAngle:360 clockwise:true];[_path fill];[_path stroke];[_path removeAllPoints];}#pragma mark draw curve --- 画贝塞尔曲线- (void)drawBezierCurveWithCircle1:(Circle *)circle1 Circle2:(Circle *)circle2 {float circle1_x = circle1.centerPoint.x;float circle1_y = circle1.centerPoint.y;float circle2_x = circle2.centerPoint.x;float circle2_y = circle2.centerPoint.y;//连心线的长度float d = sqrt(powf(circle1_x - circle2_x, 2) + powf(circle1_y - circle2_y, 2));//连心线x轴的夹角float angle1 = atan((circle2_y - circle1_y) / (circle1_x - circle2_x));//连心线和公切线的夹角float angle2 = asin((circle1.radius - circle2.radius) / d);//切点到圆心和x轴的夹角float angle3 = M_PI_2 - angle1 - angle2;float angle4 = M_PI_2 - angle1 + angle2;float offset1_X = cos(angle3) * circle1.radius;float offset1_Y = sin(angle3) * circle1.radius;float offset2_X = cos(angle3) * circle2.radius;float offset2_Y = sin(angle3) * circle2.radius;float offset3_X = cos(angle4) * circle1.radius;float offset3_Y = sin(angle4) * circle1.radius;float offset4_X = cos(angle4) * circle2.radius;float offset4_Y = sin(angle4) * circle2.radius;float p1_x = circle1_x - offset1_X;float p1_y = circle1_y - offset1_Y;float p2_x = circle2_x - offset2_X;float p2_y = circle2_y - offset2_Y;float p3_x = circle1_x + offset3_X;float p3_y = circle1_y + offset3_Y;float p4_x = circle2_x + offset4_X;float p4_y = circle2_y + offset4_Y;CGPoint p1 = CGPointMake(p1_x, p1_y);CGPoint p2 = CGPointMake(p2_x, p2_y);CGPoint p3 = CGPointMake(p3_x, p3_y);CGPoint p4 = CGPointMake(p4_x, p4_y);CGPoint p1_center_p4 = CGPointMake((p1_x + p4_x) / 2, (p1_y + p4_y) / 2);CGPoint p2_center_p3 = CGPointMake((p2_x + p3_x) / 2, (p2_y + p3_y) / 2);[self drawBezierCurveStartAt:p1 EndAt:p2 controlPoint:p2_center_p3];[self drawLineStartAt:p2 EndAt:p4];[self drawBezierCurveStartAt:p4 EndAt:p3 controlPoint:p1_center_p4];[self drawLineStartAt:p3 EndAt:p1];[_path moveToPoint:p1];[_path closePath];[_path stroke];}2.监听手势
简单版
最简单的其实就是直接在AZMetaBallCanvas中重写touchXXX等一系列方法,然后在其中调用setNeedsDisplay通知UIView重绘。
#pragma mark touch event- (void)touchesBegan:(NSSet<UITouch *> *)touches withEvent:(UIEvent *)event {UITouch *touch = [touches anyObject];_touchPoint = [touch locationInView:self];[self setNeedsDisplay];}- (void)touchesMoved:(NSSet<UITouch *> *)touches withEvent:(UIEvent *)event {UITouch *touch = [touches anyObject];_touchPoint = [touch locationInView:self];[self setNeedsDisplay];}现在其实差不多第二张图的效果已经出来了,差的就是更改两圆的半径方法。
改变半径的方法就非常简单了
#pragma 改变半径-(void)changeCenterCircleRadiusTo:(float)radius {_centerCircle.radius = radius;[self setNeedsDisplay];}-(void)changeTouchCircleRadiusTo:(float)radius {_touchCircle.radius = radius;[self setNeedsDisplay];}普通版
根据现象发现,我们需要通过拖拽小红点来移动它,而不是我们手指点哪,小红点就在哪,所以我们需要给小红点增加手势监听,而不是“画布”。
于是我们改为在画布添加方法- (void)attach:(UIView *)item;,然后再给传入的view添加Pan手势。
- (void)attach:(UIView *)item {UIPanGestureRecognizer *drag = [[UIPanGestureRecognizer alloc] initWithTarget:self action:@selector(drag:)];item.userInteractionEnabled = YES;[item addGestureRecognizer:drag];}- (void)drag:(UIPanGestureRecognizer *)recognizer {//得到触摸点_touchPoint = [recognizer locationInView:self];//得到触摸的viewUIView *touchView = recognizer.view;switch (recognizer.state) {case UIGestureRecognizerStateBegan:{//touch开始:在画布上绘制一个touchView的副本//...此部分参看源码break;}case UIGestureRecognizerStateChanged:{//移动中:记录触摸位置,更改touchView和touchCircle的坐标位置[self resetTouchCenter:_touchPoint];break;}case UIGestureRecognizerStateEnded: {//touch结束:根据连心线长度判断是执行爆炸动画还是弹簧动画//...此部分参看源码break;}default:break;}[self setNeedsDisplay]; //重绘}以上内容是小编给大家介绍的IOS设置QQ小红点消除的方法(一键退朝),希望对大家有所帮助。
新闻热点


疑难解答