为了应付蛋疼的作业,学了一周的Zend,既然学了,不能浪费啊,将经验总结下吧。其中可能有不正确或者完全是本人自己的想法,可能跟官方的标准做法不同,望各位指正。
首先是Zend的安装
在网上下载好Zend的压缩包后,解压到任意一个目录下,然后确认自己的html' target='_blank'>环境变量Path中有可运行php.exe的目录(没有的话会提示没有php.exe这个可运行程序,加上后记得注销下让变量生效)
打开命令提示符,cd进入ZendFramework的bin目录,然后试试
zf show version
zf show version
如果能输出当前的版本的话,说明安装成功,就可以创建项目了
zf create project yourprojectname path/to/location
zf create project yourprojectname path/to/location
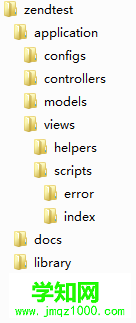
然后就可以看到你创建的项目了,如下图所示:
然后就可以开始配置运行环境了
将原解压文件中的library下的文件全部的拷到你创建的项目下的library目录下,
然后修改下apache的根目录,让根目录指向public,具体为什么后面说,然后就可以让apache运行了,试试http://localhost/index,如果成功的话就可以看到欢迎界面了。
接下来介绍下各个目录
docs :各种文档
library:zend的各种功能实现的源代码
public:网站根目录
tests:内放用来测试的程序,当然,还是得你自己写
application::最重要的文件夹了,里面是按MVC的实现布置的,对于MVC,可看我的简单介绍:ASP.NET MVC 尝鲜
configs:配置文件
controllers:控制器
models:模型
views:视图
scripts:放各种controller对应的视图文件,这些文件的后缀名都是phtml
helpers:放各种帮助类
然后就是一个关键的问题,怎样从Controller的Action中向view中传值以及实现一个页面的完整流程了
很简单,比如拿刚创建好的项目中的IndexController来说,它对应的就是views文件夹下的index文件夹
而其中的indexAction就是具体处理某个访问的Action,它对应的view就是index.phtml
而我们访问的localhost/index表示的就是采用indexController,而action采用默认的indexActio处理
<?phpclass IndexController extends Zend_Controller_Action{ public function init() { /* Initialize action controller here */ } public function indexAction() { // action body //我们在这里加一句 $this->view->content = "Hello World!!!"; }}
然后在index.phtml
<style> a:link, a:visited { color: #0398CA; } span#zf-name { color: #91BE3F; } div#welcome { color: #FFFFFF; background-image: url(http://framework.zend.com/images/bkg_header.jpg); width: 600px; height: 400px; border: 2px solid #444444; overflow: hidden; text-align: center; } div#more-information { background-image: url(http://framework.zend.com/images/bkg_body-bottom.gif); height: 100%; }</style><div id="welcome"> <h1>Welcome to the <span id="zf-name">Zend Framework!</span></h1> <h3>This is your project's main page</h3> <? echo $this->content;?><!--在这里输出,注意,这里的$this指的是action中的$this->view--> <div id="more-information"> <p><img src="http://framework.zend.com/images/PoweredBy_ZF_4LightBG.png" /></p> <p> Helpful Links: <br /> <a href="http://framework.zend.com/">Zend Framework Website</a> | <a href="http://framework.zend.com/manual/en/">Zend Framework Manual</a> </p> </div></div>接下来介绍下根目下的俩个文件:
首先是.htacess
RewriteEngine OnRewriteCond %{REQUEST_FILENAME} -s [OR]RewriteCond %{REQUEST_FILENAME} -l [OR]RewriteCond %{REQUEST_FILENAME} -dRewriteRule ^.*$ - [NC,L]RewriteRule ^.*$ index.php [NC,L]相信是明白的,无非是将所有的非资源请求交由index.php处理,这也是zend的MVC实现的关键之一,将public作为根目录就是因为这个原因
然后是index.php,通常称它为入口文件,我们来看看:
<?php// Define path to application directorydefined('APPLICATION_PATH') || define('APPLICATION_PATH', realpath(dirname(__FILE__) . '/../application'));// Define application environmentdefined('APPLICATION_ENV') || define('APPLICATION_ENV', (getenv('APPLICATION_ENV') ? getenv('APPLICATION_ENV') : 'production'));// Ensure library/ is on include_pathset_include_path(implode(PATH_SEPARATOR, array( realpath(APPLICATION_PATH . '/../library'), get_include_path(),)));/** Zend_Application */require_once 'Zend/Application.php';// Create application, bootstrap, and run$application = new Zend_Application( APPLICATION_ENV, APPLICATION_PATH . '/configs/application.ini');$application->bootstrap() ->run();整个网站的入口就是在这里,所有的非资源请求都会经过这里处理。我们也可以加一些其它的要用到的初始化程序,比如数据库、Session以及母板页等等
现将我的贴出,仅供参考,应该是不太规范的,但是能用
<?php// Define path to application directorydefined('APPLICATION_PATH') || define('APPLICATION_PATH', realpath(dirname(__FILE__) . '/../application'));// Define application environmentdefined('APPLICATION_ENV') || define('APPLICATION_ENV', (getenv('APPLICATION_ENV') ? getenv('APPLICATION_ENV') : 'production'));// Ensure library/ is on include_pathset_include_path(implode(PATH_SEPARATOR, array( realpath(APPLICATION_PATH . '/../library'), get_include_path(), realpath(APPLICATION_PATH . '/forms'),//设置了两个目录用来放专门的独立文件 realpath(APPLICATION_PATH . '/models'),//把这个目录也包含进来了,因为不知道还有什么其他方法~~>_<~~ )));require_once 'Zend/Db.php';$params = array( 'host' => '127.0.0.1', 'username' => 'root', 'password' => '', 'dbname' => 'market', 'charset' => 'UTF8', 'driver_options' => array(PDO::MYSQL_ATTR_INIT_COMMAND => 'SET NAMES UTF8' ),);$db = Zend_Db::factory('PDO_MYSQL', $params);//require_once 'Zend/Registry.php';//Zend_Registry::set('db', $db);require_once 'Zend/Db/Table.php';Zend_Db_Table::setDefaultAdapter($db);//我是用继承Zend_Db_Table的方法实现model的,因此直接将$db设置给Zenf_Db_Table,你也可以用Zend_Registry注册变量的方法/** Setup layout */require_once 'Zend/Layout.php';Zend_Layout::startMvc(APPLICATION_PATH . '/views');//MVC中的被我称为母版页的初始化程序,它默认为layout.phtml/** Zend_Application */require_once 'Zend/Application.php';// Create application, bootstrap, and run$application = new Zend_Application( APPLICATION_ENV, APPLICATION_PATH . '/configs/application.ini');$application->bootstrap() ->run();还有些杂碎的提醒:
css还有js放在public文件夹下,可以用Zend内置的helper headScript等,可以参考下我的layout.phtml
<?php echo $this->doctype('XHTML1_STRICT') ?><html> <head> <meta http-equiv="Content-Type" content="text/html; charset=utf-8" /> <?php echo $this->headTitle() ?> <?php $this->headLink()->appendStylesheet("/css/style.css"); ?> <?php echo $this->headLink() ?> <?php $this->headScript()->appendFile("/js/jquery.js"); ?> <?php echo $this->headScript() ?> </head> <body> <div class="header"> </div> <div class="main"> <?php echo $this->layout()->content ?> </div> <div class="footer"> </div> </body> </html> 还有Zend_Form挺好用的,也给出我的一个例子,具体请看手册:
<?phpclass LoginForm extends Zend_Form { public function init() { $this->setMethod('post'); $this->addElement('text', 'email', array( 'validators' => array( array('regex', false, '/^([a-zA-Z0-9_-])+@([a-zA-Z0-9_-])+((/.[a-zA-Z0-9_-]{2,3}){1,2})$/i') ), 'required' => true, 'filters' => array('StringToLower'), 'label' => '邮箱:', 'decorators' => array( array('ViewHelper', array('helper' => 'formText')), array('Label', array( 'class' => 'label', 'tag' => 'div', )), array('HtmlTag', array( 'tag' => 'div', 'class' => 'element', )), ), )); $this->addElement('password', 'password', array( 'required' => true, 'label' => '密码:', 'decorators' => array( array('ViewHelper', array('helper' => 'formPassword')), array('Label', array( 'class' => 'label', 'tag' => 'div', )), array('HtmlTag', array( 'tag' => 'div', 'class' => 'element', )), ), )); $this->addElement('submit', '提交', array( 'decorators' => array( array('ViewHelper', array('helper' => 'formSubmit')), array('HtmlTag', array( 'tag' => 'div', 'class' => 'submit', )), ), )); }}?> Zend_Db_Table的例子:
<?phpclass UserModel extends Zend_Db_Table { protected function _setup() { $this->_name = 'user'; $this->_primary = 'uid'; parent::_setup(); } public function emailExist($email) { $select = parent::select()->where('email = ?', $email); $result = $this->getAdapter()->fetchOne($select); if (!empty($result)) return true; else return false; } }?> 好了,就先介绍到这,再说一次,上面的例子都是参考,可能不太规范,网上的zend的学习资料很多,手册也挺详细的,毕竟是php的官方都推荐的,是个不错的框架,也方便使用,推荐大家想快速开发网站的时候用。
郑重声明:本文版权归原作者所有,转载文章仅为传播更多信息之目的,如作者信息标记有误,请第一时间联系我们修改或删除,多谢。
新闻热点


疑难解答