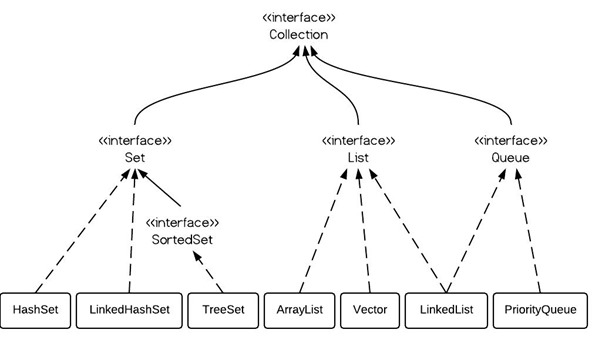
java种多线程实现方式主要有5种,继承Thread类,实现Runnable接口、实现Callable和 FutureTask包装器来创建Thread线程、使用ExecutorService、Callable、Future实现有返回结果的多线程,使用线程池来实现多线程。
方式一:继承Thread类
public class ThreadTest { public static void main(String[] args){ for(int i = 0;i<100;i++){ MyThread my = new MyThread(); my.start(); } }}class MyThread extends Thread{ public void run(){ System.out.PRintln(Thread.currentThread().getId()); }}方式二:实现Runnable接口public class ThreadTest { public static void main(String[] args){ for(int i = 0;i<100;i++){ Thread my = new Thread(new MyThread()); my.start(); } }}class MyThread implements Runnable{ public void run(){ System.out.println(Thread.currentThread().getId()); }}方式三:使用FutureTask 和Callable接口的到返回值Callable<String> callable = new Callable<String>(){ @Override public String call() throws Exception { // TODO Auto-generated method stub return new Random().nextInt(1000)+""; } }; FutureTask<String> future = new FutureTask<String>(callable); new Thread(future).start(); try { Thread.sleep(1000); System.out.println(future.get()); } catch (InterruptedException e) { // TODO Auto-generated catch block e.printStackTrace(); } catch (ExecutionException e) { // TODO Auto-generated catch block e.printStackTrace(); }方式四:使用Future和Callable接口
ExecutorService threadPool = Executors.newCachedThreadPool(); CompletionService<Integer> cs = new ExecutorCompletionService<Integer>(threadPool); for(int i = 1; i < 5; i++) { final int taskID = i; cs.submit(new Callable<Integer>() { public Integer call() throws Exception { return taskID; } }); } // 可能做一些事情 for(int i = 1; i < 5; i++) { try { System.out.println(cs.take().get()); } catch (InterruptedException e) { e.printStackTrace(); } catch (ExecutionException e) { e.printStackTrace(); } }方式五:使用线程池创建线程 @Test public void testSingleThreadPool() { // 创建单个线程 ExecutorService singleThreadPool = Executors.newSingleThreadExecutor(); singleThreadPool.execute(new Runnable() { @Override public void run() { System.out.println(Thread.currentThread().getId()); } }); } @Test public void testCachedThreadPool() { // 创建缓冲线程池 ExecutorService cachedThreadPool = Executors.newCachedThreadPool(); for (int i = 0; i < 100; i++) cachedThreadPool.execute(new Runnable() { @Override public void run() { System.out.println(Thread.currentThread().getId()); } }); } @Test public void testFixedThreadPool(){ //创建5个线程的固定线程池 ExecutorService fixedThreadPool = Executors.newFixedThreadPool(5); for(int i = 0;i<5;i++ ) fixedThreadPool.execute(new Runnable() { @Override public void run() { System.out.println(Thread.currentThread().getId()); } }); } @Test public void testThreadPool(){ ThreadPoolExecutor pool = new ThreadPoolExecutor(5,8,1,TimeUnit.SECONDS,new ArrayBlockingQueue<Runnable>(100));//这种式JDK实现线程池的方式 for(int i=0;i<100;i++) pool.execute(new Runnable(){ @Override public void run() { System.out.println(Thread.currentThread().getId()); } }); }
新闻热点


疑难解答