前言
本文主要给大家介绍了关于swift 4自定义UITableCell的相关内容,分享出来供大家参考学习价值,下面话不多说了,来一起看看详细的介绍吧
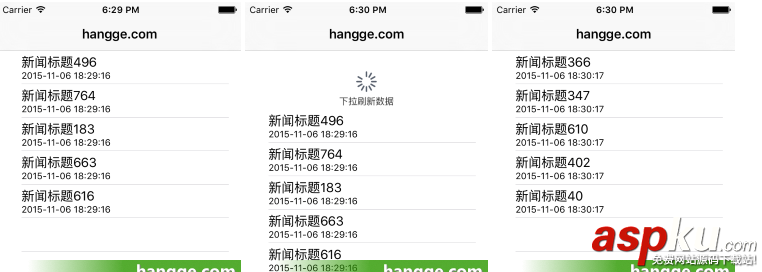
直接上图

新建MenuCell
创建一个类 MenuCell 继承 UITableViewCell 添加两个要实现的方法
override init(style: UITableViewCellStyle, reuseIdentifier: String?) { super.init(style: style, reuseIdentifier: reuseIdentifier)}required init?(coder aDecoder: NSCoder) { super.init(coder: aDecoder)} 初始化组件
把tableCell里要显示的组件都初始化好,我这里就只有两个组件
class MenuCell: UITableViewCell { var icon = UIImageView() var lazy var box = UIView() override init(style: UITableViewCellStyle, reuseIdentifier: String?) { super.init(style: style, reuseIdentifier: reuseIdentifier) box.addSubview(icon) box.addSubview(title) self.addSubview(box) }} 组件加进去了,接下来就是布局了,Github上有个star数很高的布局库,用pod安装就可以用了,地址:https://github.com/SnapKit/SnapKit
布局
用法还是比较简单的,看文档就能明白大概用法了,下面是我的布局
override init(style: UITableViewCellStyle, reuseIdentifier: String?) { super.init(style: style, reuseIdentifier: reuseIdentifier) box.addSubview(icon) box.addSubview(title) self.addSubview(box) icon.snp.makeConstraints { (make) in // 设置icon组件距离box组件左,上各10个距离单位(不太清楚是不是像素),偏移12个距离单位 make.left.top.equalTo(10).offset(12) // 设置icon的宽高各20个单位 make.width.height.equalTo(20) } title.snp.makeConstraints { (make) in // 设置title组件位置从icon组件的右边开始算起,再偏移10个单位 make.left.equalTo(self.icon.snp.right).offset(10) // 设置title距离上面高度跟icon一样 make.top.equalTo(self.icon) }} 给TableCell附值
在 MenuCell 里新建一个方法,可以把在 TableView里创建好的数据传过来并给icon,title,附上值
func setValueForCell(menu: MenuModel) { title.text = menu.title icon = ImageUtil.loadImageFromUrl(imageView: icon, url: menu.url)} 方法里的 ImageUtil 是我封装的一个静态方法,用于显示网络图片的
class ImageUtil { class func loadImageFromUrl(imageView: UIImageView, url: String) -> UIImageView { //定义URL对象 let url = URL(string: url) //从网络获取数据流 let data = try! Data(contentsOf: url!) //通过数据流初始化图片 let newImage = UIImage(data: data) imageView.image = newImage return imageView }} 上面自定义的加载网络图片的方法会有很长的延迟,当点击Cell进入下一面的时候,网络加载会花大量时间,这样会导致页面出现白屏,解决办法有两个,一个是把加载图片的地方改成异步加载,一个是引用第三方的图片加载库
将网络消耗的代码放在异步线程里方法
func setValueForCell(menu: MenuModel) { title.text = menu.title DispatchQueue.global().async { self.icon = ImageUtil.loadImageFromUrl(imageView: self.icon, url: menu.url) } //icon = ImageUtil.loadImageFromUrl(imageView: icon, url: menu.url)} 这样程序就不会卡了,运行会看到图片最开始是没有的,然后慢慢的加载出来,但这样xcode会报一个错 UIImageView.image must be used from main thread only 网上查了一下,这是把ui操作放在异步里执行的问题,如果一个异步操作耗时很长,那么程序就会进入假死状态,系统就会弹出 就用无响应 这样的提示,所以这种是不推荐的
另一种是引入第三方类库 https://github.com/onevcat/Kingfisher
用法也很简单
import Kingfisherlet url = URL(string: menu.icon)//设置加载菊花self.icon.kf.indicatorType = .activityself.icon.kf.setImage(with: url)
方法里的 MenuModel 是我定义的一个菜单的结构体
struct MenuModel { var title: String var url: String} 处理TableView渲染方法
先在在tableView里注册自己定义的 TableCell
override func viewDidLoad() { // ... //注册cell的Identifier,用于渲染cell self.tableView.register(MenuCell.self, forCellReuseIdentifier: "cellID") } 修改渲染方法
//渲染cellfunc tableView(_ tableView: UITableView, cellForRowAt indexPath: IndexPath) -> UITableViewCell { let cell = tableView.dequeueReusableCell(withIdentifier: "cellID") as! MenuCell cell.setValueForCell(menu: data[indexPath.row]) return cell} 这样就好了,直接运行看效果吧
还是带上图片了app才好看
总结
以上就是这篇文章的全部内容了,希望本文的内容对大家的学习或者工作具有一定的参考学习价值,如果有疑问大家可以留言交流,谢谢大家对VEVB武林网的支持。
注:相关教程知识阅读请移步到swift教程频道。