IOS应用开发中UITableView的应用十分广泛,但是IOS7神一样的把UITableView拍扁了,这样一来IOS6的UITableView不干了,就吵着也要被拍扁,那好吧我今天就成全了你。。。
继上回书说道初步实现了一个QQ音乐的框架,但这远远不够,我是一个追求细节的人(就像锤子科技的老罗一样),怎么可能就这就结束了呢,下一步实现以下登陆的ModalView,比较简单没啥可说的直接上代码:
1 UIColor *normalColor = [UIColor colorWithRed:28/255.0 green:191/255.0 blue:97/255.0 alpha:1]; //按钮默认状态的绿色 2 UIColor *selectedColor = [UIColor colorWithRed:185/255.0 green:227/255.0 blue:214/255.0 alpha:1]; //按钮点击状态的淡绿色 3 CGFloat navigationY = 0; 4 if (IOS_7) { 5 navigationY = 20; 6 } 7 8 9 UINavigationBar *loginNavigationBar = [[UINavigationBar alloc] initWithFrame:CGRectMake(0, navigationY, 320, 44)]; //UINavigationBar的位置10 UIButton *cancelButton = [UIButton buttonWithType:UIButtonTypeSystem];11 [cancelButton setFrame:CGRectMake(0, 0, 40, 40)];12 [cancelButton setTitle:@"取消" forState:UIControlStateNormal];13 [cancelButton setTitleColor:normalColor forState:UIControlStateNormal];14 [[cancelButton titleLabel] setFont:[UIFont systemFontOfSize:18]];15 [cancelButton setTitleColor:selectedColor forState:UIControlStateHighlighted];16 [cancelButton addTarget:self action:@selector(dismissView) forControlEvents:UIControlEventTouchUpInside];17 UIBarButtonItem *cancelItem = [[UIBarButtonItem alloc] initWithCustomView:cancelButton]; //初始化取消按钮18 19 20 UIButton *loginButton = [UIButton buttonWithType:UIButtonTypeSystem];21 [loginButton setFrame:CGRectMake(0, 0, 40, 40)];22 [loginButton setTitle:@"登陆" forState:UIControlStateNormal];23 [loginButton setTitleColor:normalColor forState:UIControlStateNormal];24 [[loginButton titleLabel] setFont:[UIFont systemFontOfSize:18]];25 [loginButton setTitleColor:selectedColor forState:UIControlStateHighlighted];26 [loginButton addTarget:self action:@selector(loginAction) forControlEvents:UIControlEventTouchUpInside];27 UIBarButtonItem *loginItem = [[UIBarButtonItem alloc] initWithCustomView:loginButton]; //初始化登陆按钮28 29 UIImage *image = [UIImage imageNamed:@"input_login_line"];30 31 UIImageView *userLineView = [[UIImageView alloc] initWithImage:image];32 UIImageView *passWordLineView = [[UIImageView alloc] initWithImage:image]; //输入框下面的绿线33 34 UITextField *userTextField = [[UITextField alloc] initWithFrame:CGRectMake(30, 100+navigationY, 260, 30)];35 [userTextField setPlaceholder:@"QQ号/手机/邮箱"];36 [userTextField setClearButtonMode:UITextFieldViewModeWhileEditing];37 [userTextField setKeyboardType:UIKeyboardTypeNumbersAndPunctuation];38 [userTextField setReturnKeyType:UIReturnKeyNext];39 [userLineView setFrame:CGRectMake(30, 131+navigationY, 260, 1)];40 41 UITextField *passwordTextField = [[UITextField alloc] initWithFrame:CGRectMake(30, 140+navigationY, 260, 30)];42 [passwordTextField setPlaceholder:@"密码"];43 [passwordTextField setClearButtonMode:UITextFieldViewModeWhileEditing];44 [passwordTextField setKeyboardType:UIKeyboardTypeASCIICapable];45 [passwordTextField setReturnKeyType:UIReturnKeyDone];46 [passwordLineView setFrame:CGRectMake(30, 171+navigationY, 260, 1)];47 48 UILabel *regStr = [[UILabel alloc] initWithFrame:CGRectMake(75, 180+navigationY, 110, 30)];49 [regStr setText:@"没有账号?点击这里"];50 [regStr setFont:[UIFont systemFontOfSize:12]];51 [regStr setTextColor:[UIColor darkGrayColor]];52 UILabel *greenStr = [[UILabel alloc] initWithFrame:CGRectMake(184, 180+navigationY, 60, 30)];53 [greenStr setText:@"快速注册"];54 [greenStr setFont:[UIFont systemFontOfSize:12]];55 [greenStr setTextColor:normalColor];56 57 UINavigationItem *navigationItem = [[UINavigationItem alloc] initWithTitle:@"登陆"];58 [navigationItem setLeftBarButtonItem:cancelItem];59 [navigationItem setRightBarButtonItem:loginItem];60 [loginNavigationBar pushNavigationItem:navigationItem animated:YES];61 62 63 64 [self.view addSubview:loginNavigationBar];65 [self.view addSubview:userTextField];66 [self.view addSubview:userLineView];67 [self.view addSubview:passwordTextField];68 [self.view addSubview:passwordLineView];69 [self.view addSubview:regStr];70 [self.view addSubview:greenStr];
总结起来就是一个UINavigationBar,UINavigationBar上面有两个按钮,两个UITextField。只得说的事这个按钮,IOS7中把按钮的衣服扒掉了,这就直接导致我也要让IOS6的按钮也裸奔:
1 [[UINavigationBar appearance] setBackgroundImage:[UIImage imageWithColor:[UIColor whiteColor] size:CGSizeMake(1, 44)] forBarMetrics:UIBarMetricsDefault];
好了然后就没什么特别的了改改UITextField关联的键盘字体大小颜色什么的,效果图如下:


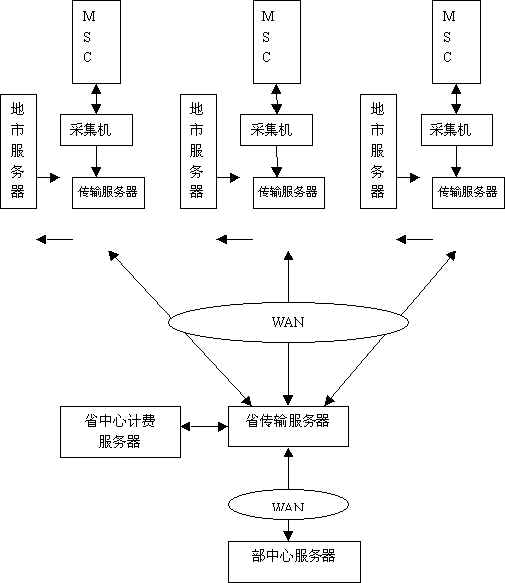
下面就是硬菜了,QQ音乐的界面UITableView采用的是UITableViewStyleGrouped类型的,但是在IOS6下UITableView有一个讨厌的灰不拉几的背景,我要把背景变为白色,使用如下代码:
1 [tableView setBackgroundColor:[UIColor whiteColor]]; 2 [tableView setBackgroundView:nil];
这样UITableView在IOS6中那讨厌的背景就没有了,但是UITableViewCell默认是圆角的很恶心,干掉:
1 UIView *tempView = [[UIView alloc] init];2 [cell setBackgroundView:tempView];
还要去掉cell点击时的圆角:
1 cell.selectedBackgroundView = [[UIView alloc] initWithFrame:cell.frame];2 cell.selectedBackgroundView.backgroundColor = [UIColor lightGrayColor];
这里可以不用设置颜色的,而且现在这个颜色挺难看的,我还要继续修改
还有个问题IOS6的UITableViewCell默认不是与屏幕同宽的,需要自定义一个UItableViewCell复写 layoutSubviews 方法,代码如下:
1 - (void) layoutSubviews {2 [super layoutSubviews];3 self.backgroundView.frame = CGRectMake(0, 0, 320, 44);4 self.selectedBackgroundView.frame = CGRectMake(0, 0, 320, 44);5 }
好了这样初步的适配完了,当然还有细节没有做到,继续学习吧,下面是我的音乐视图控制器的完整代码:
1 // 2 // MyMusicViewController.m 3 // QQMusic 4 // 5 // Created by 赵 福成 on 14-5-21. 6 // Copyright (c) 2014年 ZhaoFucheng. All rights reserved. 7 // 8 9 #import "MyMusicViewController.h" 10 #import "UIImage+CustomPureColor.h" 11 #import "UIButton+CustomButton.h" 12 #import "LoginViewController.h" 13 #import "CustomTableViewCell.h" 14 #define IOS_7 ([[[UIDevice currentDevice] systemVersion] floatValue] >= 7.0) 15 @interface MyMusicViewController () 16 17 @end 18 19 @implementation MyMusicViewController 20 21 NSArray *mainScreenCells; 22 NSArray *details; 23 NSArray *icon; 24 NSArray *iconSelected; 25 26 - (id)initWithNibName:(NSString *)nibNameOrNil bundle:(NSBundle *)nibBundleOrNil 27 { 28 self = [super initWithNibName:nibNameOrNil bundle:nibBundleOrNil]; 29 if (self) { 30 // Custom initialization 31 32 self.title = @"我的音乐"; 33 } 34 return self; 35 } 36 37 - (void)viewDidLoad 38 { 39 [super viewDidLoad]; 40 // Do any additional setup after loading the view. 41 42 43 //我的音乐按钮 44 UIButton *myMusicButton = [[UIButton alloc] initWithFrame:CGRectMake(0, 0, 35, 35)]; 45 [myMusicButton setImage:[UIImage imageNamed:@"defaultSinger"] forState:UIControlStateNormal]; 46 [myMusicButton setImage:[UIImage imageNamed:@"defaultSinger"] forState:UIControlStateHighlighted]; 47 // myMusicButton.userInteractionEnabled = NO; 48 myMusicButton.titleLabel.textAlignment = NSTextAlignmentLeft; 49 [myMusicButton addTarget:self action:@selector(login:) forControlEvents:UIControlEventTouchUpInside]; 50 UIBarButtonItem *myMusicButtonItem = [[UIBarButtonItem alloc] initWithCustomView:myMusicButton]; 51 52 //播放界面按钮 53 UIBarButtonItem *nowPlayingButtonItem = [[UIBarButtonItem alloc] initWithCustomView:[UIButton initNowPlayingButton]]; 54 [self.navigationItem setLeftBarButtonItem:myMusicButtonItem]; 55 [self.navigationItem setRightBarButtonItem:nowPlayingButtonItem]; 56 57 mainScreenCells = [NSArray arrayWithObjects:[NSArray arrayWithObjects:@"全部歌曲", nil],[NSArray arrayWithObjects:@"我喜欢", @"全部歌单", nil],[NSArray arrayWithObjects:@"下载歌曲", @"最近播放", @"ipod歌曲", nil], nil]; 58 59 details = [NSArray arrayWithObjects:[NSArray arrayWithObjects:@"0首在本地", nil], [NSArray arrayWithObjects:@"", @"", nil],[NSArray arrayWithObjects:@"0首", @"18首", @"0首", nil], nil]; 60 61 icon = [NSArray arrayWithObjects:[NSArray arrayWithObjects:@"allsongs", nil], [NSArray arrayWithObjects:@"cell_like_in_my_music", @"", nil],[NSArray arrayWithObjects:@"down", @"recent_listen_icon", @"ipod", nil], nil]; 62 63 iconSelected = [NSArray arrayWithObjects:[NSArray arrayWithObjects:@"allsongsSelected", nil], [NSArray arrayWithObjects:@"cell_like_in_my_music_PRessed", @"", nil],[NSArray arrayWithObjects:@"downSelected", @"recent_listen_icon_h", @"ipodSelected", nil], nil]; 64 65 UITableView *tableView = [[UITableView alloc] initWithFrame:[[UIScreen mainScreen] bounds] style:UITableViewStyleGrouped]; 66 [tableView setDataSource:self]; 67 if (!IOS_7) { 68 [tableView setSeparatorStyle:UITableViewCellSeparatorStyleNone]; 69 } 70 [tableView setBackgroundColor:[UIColor whiteColor]]; 71 [tableView setBackgroundView:nil]; 72 [tableView setDelegate:self]; 73 [self.view addSubview:tableView]; 74 75 } 76 77 - (NSInteger)numberOfSectionsInTableView:(UITableView *)tableView 78 { 79 return mainScreenCells.count; 80 } 81 82 - (NSInteger)tableView:(UITableView *)tableView numberOfRowsInSection:(NSInteger)section 83 { 84 return [[mainScreenCells objectAtIndex:section] count]; 85 } 86 87 - (UITableViewCell *)tableView:(UITableView *)tableView cellForRowAtIndexPath:(NSIndexPath *)indexPath 88 { 89 static NSString *cellId = @"cellId"; 90 UITableViewCell *cell = [tableView dequeueReusableCellWithIdentifier:cellId]; 91 if (cell == nil) { 92 cell = [[CustomTableViewCell alloc] initWithStyle:UITableViewCellStyleSubtitle reuseIdentifier:cellId]; 93 } 94 NSUInteger rowNo = indexPath.row; 95 NSUInteger colNo = indexPath.section; 96 cell.textLabel.text = [[mainScreenCells objectAtIndex:colNo] objectAtIndex:rowNo]; 97 if (!IOS_7) { 98 UIView *line = [[UIView alloc] initWithFrame:CGRectMake(cell.frame.origin.x + 50, cell.frame.size.height, cell.frame.size.width - 20, 0.5)]; 99 line.backgroundColor = [UIColor lightGrayColor];100 [cell.contentView addSubview:line];101 }102 NSString *iconStr = (NSString *)[[icon objectAtIndex:colNo] objectAtIndex:rowNo];103 NSString *iconSelectStr = (NSString *)[[iconSelected objectAtIndex:colNo] objectAtIndex:rowNo];104 if (iconStr.length == 0 && iconSelectStr.length == 0) {105 cell.imageView.image = [UIImage imageWithColor:[UIColor clearColor] size:CGSizeMake(50, 56)];106 cell.imageView.highlightedImage = [UIImage imageWithColor:[UIColor clearColor] size:CGSizeMake(50, 56)];107 }108 else109 {110 cell.imageView.image = [UIImage imageNamed:iconStr];111 cell.imageView.highlightedImage = [UIImage imageNamed:iconSelectStr];112 }113 114 cell.detailTextLabel.text = [[details objectAtIndex:colNo] objectAtIndex:rowNo];115 // [cell setaccessoryType:UITableViewCellAccessoryDisclosureIndicator];116 [cell setAccessoryView:[[UIImageView alloc] initWithImage:[UIImage imageNamed:@"arrow"]]];117 118 //设置标题和描述背景透明119 cell.textLabel.backgroundColor = [UIColor clearColor];120 cell.detailTextLabel.backgroundColor = [UIColor clearColor];121 122 //去掉cell的圆角123 UIView *tempView = [[UIView alloc] init];124 [cell setBackgroundView:tempView];125 126 //cell点击时的颜色127 cell.selectedBackgroundView = [[UIView alloc] initWithFrame:cell.frame];128 cell.selectedBackgroundView.backgroundColor = [UIColor lightGrayColor];129 130 return cell;131 }132 133 134 - (void)tableView:(UITableView *)tableView didHighlightRowAtIndexPath:(NSIndexPath *)indexPath135 {136 UITableViewCell *cell = [tableView cellForRowAtIndexPath:indexPath];137 [cell setAccessoryView:[[UIImageView alloc] initWithImage:[UIImage imageNamed:@"arrow_gedan"]]];138 }139 140 - (void)tableView:(UITableView *)tableView didDeselectRowAtIndexPath:(NSIndexPath *)indexPath141 {142 UITableViewCell *cell = [tableView cellForRowAtIndexPath:indexPath];143 [cell setAccessoryView:[[UIImageView alloc] initWithImage:[UIImage imageNamed:@"arrow"]]];144 145 }146 147 - (CGFloat)tableView:(UITableView *)tableView heightForHeaderInSection:(NSInteger)section148 {149 return 0.1;150 }151 152 - (void)login:(UIButton *)sender153 {154 LoginViewController *loginView = [[LoginViewController alloc] init];155 [self presentViewController:loginView animated:YES completion:^{156 157 }];158 }159 160 - (void)didReceiveMemoryWarning161 {162 [super didReceiveMemoryWarning];163 // Dispose of any resources that can be recreated.164 }165 166 167 168 /*169 #pragma mark - Navigation170 171 // In a storyboard-based application, you will often want to do a little preparation before navigation172 - (void)prepareForSegue:(UIStoryboardSegue *)segue sender:(id)sender173 {174 // Get the new view controller using [segue destinationViewController].175 // Pass the selected object to the new view controller.176 }177 */178 179 @end
再来张效果图:


睡觉去了。。。。。。
新闻热点


疑难解答