角色是网站中都有的一个功能,用来区分用户的类型、划分用户的权限,这次实现角色列表浏览、角色添加、角色修改和角色删除。
一、业务逻辑层
1、角色模型
Ninesky.Core【右键】->添加->类,输入类名Role。
引用System.ComponentModel.DataAnnotations命名空间
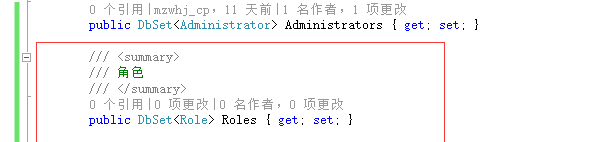
using System.ComponentModel.DataAnnotations;namespace Ninesky.Core{ /// <summary> /// 角色 /// </summary> public class Role { [Key] public int RoleID { get; set; } /// <summary> /// 名称 /// </summary> [Required(ErrorMessage ="必须输入{0}")] [StringLength(20,MinimumLength =2, ErrorMessage ="{0}长度为{2}-{1}个字符")] [Display(Name ="名称")] public string Name { get; set; } /// <summary> /// 说明 /// </summary> [StringLength(1000, ErrorMessage = "{0}必须少于{1}个字符")] [Display(Name = "说明")] public string Description { get; set; } }}2、添加表映射
打开Ninesky.Core/NineskyContext.cs,添加Role表映射
3、迁移数据
1)、启用数据迁移
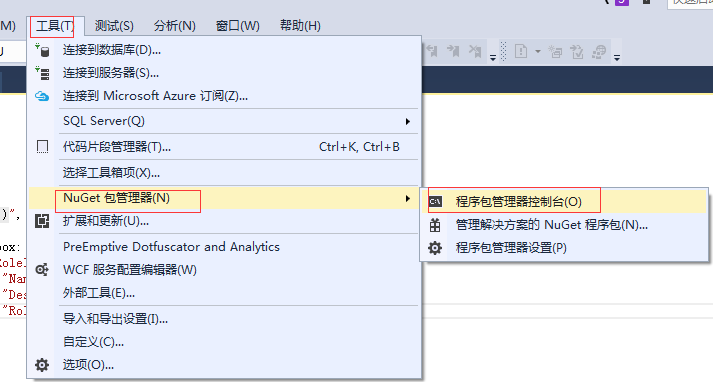
在【工具栏】->【工具】->NuGet包管理器->程序包管理器控制台。

输入命令 Enable-Migrations 回车,为Ninesk.Core启用数据迁移。
打开Ninesky.Core/Migrations/Configuration.cs文件

将 AutomaticMigrationsEnabled = false;改为 AutomaticMigrationsEnabled = ture;来启用自动迁移。
2)、更新数据表
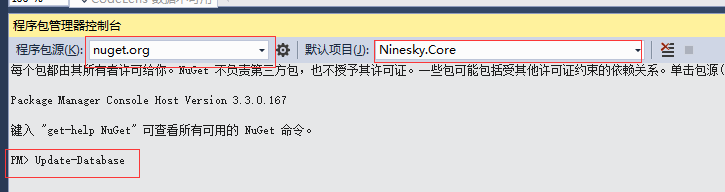
运行命令Update-Database。提示错误:There is already an object named 'Administrators' in the database.
这是因为先生成了Administrators表后启用的数据迁移。在更新表的时候视图创建Administrators表失败。
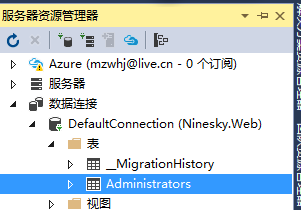
打开服务器资源管理器,如图选择Administrators【右键】->删除。
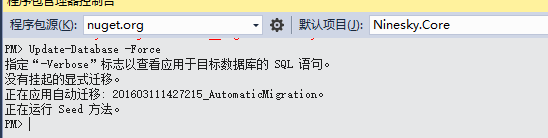
删除成功后再次运行Update-Database,执行成功。
因为刚才删除表的时候把管理员账号也删掉了,记得打开Administrators表添加一个管理员账号,记得密码可以输入jZae727K08KaOmKSgOaGzww/XVqGr/PKEgIMkjrcbJI= 这是123456加密后的字符串。
4、角色管理
Ninesky.Core【右键】->添加->类,输入类名RoleManager,类继承自BaseManager<Role>
using System;using System.Collections.Generic;using System.Linq;using System.Text;using System.Threading.Tasks;namespace Ninesky.Core{ /// <summary> /// 角色管理 /// </summary> public class RoleManager:BaseManager<Role> { }} 二、展示层
Ninesky.Web/Areas/Control/Controllers【右键】->添加->控制器。选择 MVC5 控制器 � 空, 输入控制器名称RoleController。
在控制器中引入命名空间Ninesky.Core;
添加变量private RoleManager roleManager = new RoleManager();
为控制器添加身份验证[AdminAuthorize]
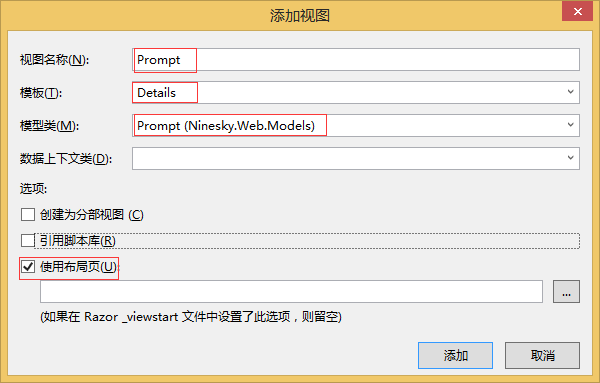
1、消息提示
在进行操作的时候经常会需要对操作成功、失败、发生错误进行提示,所以专门做一个提示的模型类Prompt。
1)、添加类
Ninesky.Web/Models【右键】->添加->类 输入类名Prompt
2、在控制器中引入类的命名空间
在Rolecontroller中引用命名空间Ninesky.Web.Models。
3、添加视图
在Ninesky.Web/Areas/Control/Views/Shared【右键】->添加->视图
@model Ninesky.Web.Models.Prompt@{ ViewBag.Title = Model.Title;}@section SideNav{@Html.Partial("SideNavPartialView")}<ol class="breadcrumb"> <li><span class="glyphicon glyphicon-home"></span> @Html.ActionLink("首页", "Index", "Home")</li> <li class="active">@Model.Title</li></ol><div class="panel panel-default"> <div class="panel-heading"><div class="panel-title">@Model.Title</div></div> <div class="panel-body"> <p>@Html.Raw(Model.Message)</p> @if(Model.Buttons!=null && Model.Buttons.Count > 0) { <p> @foreach(var item in Model.Buttons) { @Html.Raw(item+ " ") } </p> } </div></div>2、管理员列表
1)、返回列表方法(Json方式)
在控制中添加方法 ListJson() ,返回类型 JsonResoult
/// <summary> /// 列表【Json】 /// </summary> /// <returns></returns> public JsonResult ListJson() { return Json(roleManager.FindList()); }2、添加角色首页视图
在index()方法【右键】->添加视图

@{ ViewBag.Title = "角色管理";}@section SideNav{@Html.Partial("SideNavPartialView")}<ol class="breadcrumb"> <li><span class="glyphicon glyphicon-home"></span> @Html.ActionLink("首页", "Index", "Home")</li> <li>@Html.ActionLink("用户管理", "Index", "User")</li> <li class="active">@Html.ActionLink("角色管理", "Index", "Role")</li></ol><table id="admingrid"></table>@section style{ @Styles.Render("~/Content/bootstrapplugincss")}@section scripts{ @Scripts.Render("~/bundles/jqueryval") @Scripts.Render("~/bundles/bootstrapplugin") <script type="text/javascript"> $(document).ready(function () { //表格 var $table = $('#admingrid'); $table.bootstrapTable({ showRefresh: true, showColumns: true, showFooter: true, method: "post", url: "@Url.Action("ListJson")", columns: [ { title: "ID", field: "RoleID" }, { title: "名称", field: "Name", formatter: function (value, row, index) { return "<a href='@Url.Action("Modify", "Role")/" + row.RoleID + "'>" + value + "</a>" } }, { title: "说明", field: "Description" }, { title: "操作", field: "RoleID", formatter: function (value) { return "<a class='btn btn-sm btn-danger' data-operation='deleterole' data-value='" + value + "'>删除</a>" } } ], onLoadSuccess: function () { //删除按钮 $("a[data-operation='deleterole']").click(function () { var id = $(this).attr("data-value"); BootstrapDialog.confirm("你确定要删除" + $(this).parent().parent().find("td").eq(1).text() + "吗?", function (result) { if (result) { $.post("@Url.Action("DeleteJson", "Role")", { id: id }, function (data) { if (data.Code == 1) { BootstrapDialog.show({ message: "删除角色成功", buttons: [{ icon: "glyphicon glyphicon-ok", label: "确定", action: function (dialogItself) { $table.bootstrapTable("refresh"); dialogItself.close(); } }] }); } else BootstrapDialog.alert(data.Message); }, "json"); } }); }); //删除按钮结束 } }); //表格结束 }); </script>}3、导航视图
导航视图显示在视图的左侧,对该控制器下的功能进行导航
Ninesky.Web/Areas/Control/Views/Role【右键】->添加->视图

<div class="panel panel-default"> <div class="panel-heading"> <div class="panel-title"><span class="glyphicon glyphicon-user"></span> 用户管理</div> </div> <div class="panel-body"> <div class="list-group"> <div class="list-group-item"><span class="glyphicon glyphicon-plus"></span> @Html.ActionLink("角色添加", "Add", "Role")</div> <div class="list-group-item"><span class="glyphicon glyphicon-list"></span> @Html.ActionLink("角色管理", "Index", "Role")</div> </div> </div></div>4、添加角色
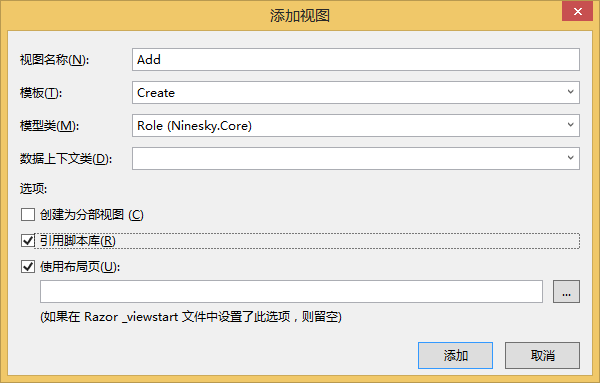
1)、添加方法
在控制器中添加Add方法
2)、添加视图
在方法上右键添加视图
@model Ninesky.Core.Role@{ ViewBag.Title = "添加角色";}@section SideNav{@Html.Partial("SideNavPartialView")}<ol class="breadcrumb"> <li><span class="glyphicon glyphicon-home"></span> @Html.ActionLink("首页", "Index", "Home")</li> <li>@Html.ActionLink("用户管理", "Index", "User")</li> <li>@Html.ActionLink("角色管理", "Index", "Role")</li> <li class="active">添加角色</li></ol>@using (Html.BeginForm()) { @Html.AntiForgeryToken() <div class="form-horizontal"> @Html.ValidationSummary(true, "", new { @class = "text-danger" }) <div class="form-group"> @Html.LabelFor(model => model.Name, htmlAttributes: new { @class = "control-label col-md-2" }) <div class="col-md-10"> @Html.EditorFor(model => model.Name, new { htmlAttributes = new { @class = "form-control" } }) @Html.ValidationMessageFor(model => model.Name, "", new { @class = "text-danger" }) </div> </div> <div class="form-group"> @Html.LabelFor(model => model.Description, htmlAttributes: new { @class = "control-label col-md-2" }) <div class="col-md-10"> @Html.EditorFor(model => model.Description, new { htmlAttributes = new { @class = "form-control" } }) @Html.ValidationMessageFor(model => model.Description, "", new { @class = "text-danger" }) </div> </div> <div class="form-group"> <div class="col-md-offset-2 col-md-10"> <input type="submit" value="保存" class="btn btn-default" /> </div> </div> </div>}@section Scripts { @Scripts.Render("~/bundles/jqueryval")}3)、添加提交数据的接收处理方法
在控制器中添加Add方法的post方法
[HttpPost] [ValidateAntiForgeryToken] public ActionResult Add(Role role) { if (ModelState.IsValid) { if (roleManager.Add(role).Code == 1) { return View("Prompt", new Prompt() { Title = "添加角色成功", Message ="你已成功添加了角色【"+ role.Name+"】", Buttons = new List<string>() { "<a href=/"" + Url.Action("Index", "Role") + "/" class=/"btn btn-default/">角色管理</a>", "<a href=/"" + Url.Action("Add", "Role") + "/" class=/"btn btn-default/">继续添加</a>"} }); } } return View(role); }5、管理员资料修改
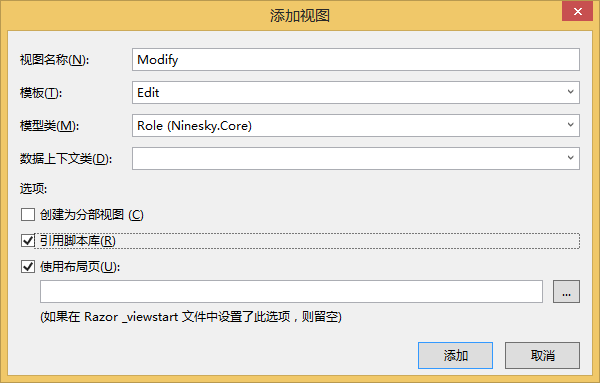
1)、添加方法
在控制器中添加Modify方法。
/// <summary> /// 修改 /// </summary> /// <param name="id">RoleID</param> /// <returns></returns> public ActionResult Modify(int id) { var _role = roleManager.Find(id); if(_role == null) return View("Prompt", new Prompt() { Title = "错误", Message = "ID为【" + id + "】的角色不存在", Buttons = new List<string>() { "<a href=/"" + Url.Action("Index", "Role") + "/" class=/"btn btn-default/">角色管理</a>"} }); return View(_role); }2)、添加视图
在方法中右键添加视图
代码如下:
@model Ninesky.Core.Role@{ ViewBag.Title = Model.Name;}@section SideNav{@Html.Partial("SideNavPartialView")}<ol class="breadcrumb"> <li><span class="glyphicon glyphicon-home"></span> @Html.ActionLink("首页", "Index", "Home")</li> <li>@Html.ActionLink("用户管理", "Index", "User")</li> <li>@Html.ActionLink("角色管理", "Index", "Role")</li> <li class="active">修改</li></ol>@using (Html.BeginForm()){ @Html.AntiForgeryToken() <div class="form-horizontal"> @Html.ValidationSummary(true, "", new { @class = "text-danger" }) @Html.HiddenFor(model => model.RoleID) <div class="form-group"> @Html.LabelFor(model => model.Name, htmlAttributes: new { @class = "control-label col-md-2" }) <div class="col-md-10"> @Html.EditorFor(model => model.Name, new { htmlAttributes = new { @class = "form-control" } }) @Html.ValidationMessageFor(model => model.Name, "", new { @class = "text-danger" }) </div> </div> <div class="form-group"> @Html.LabelFor(model => model.Description, htmlAttributes: new { @class = "control-label col-md-2" }) <div class="col-md-10"> @Html.EditorFor(model => model.Description, new { htmlAttributes = new { @class = "form-control" } }) @Html.ValidationMessageFor(model => model.Description, "", new { @class = "text-danger" }) </div> </div> <div class="form-group"> <div class="col-md-offset-2 col-md-10"> <input type="submit" value="保存" class="btn btn-default" /> </div> </div> </div>}@section Scripts { @Scripts.Render("~/bundles/jqueryval")}3)、添加提交数据的接收处理方法
在控制器中添加post方式的提交处理方法Modify方法。
[HttpPost] [ValidateAntiForgeryToken] public ActionResult Modify(Role role) { if (ModelState.IsValid) { var _resp = roleManager.Update(role); if (_resp.Code == 1) return View("Prompt", new Prompt() { Title = "修改角色成功", Message = "你已成功修改了角色【" + role.Name + "】", Buttons = new List<string>() { "<a href=/"" + Url.Action("Index", "Role") + "/" class=/"btn btn-default/">角色管理</a>", "<a href=/"" + Url.Action("Modify", "Role", new { id = role.RoleID }) + "/" class=/"btn btn-default/">查看</a>", "<a href=/"" + Url.Action("Add", "Role") + "/" class=/"btn btn-default/">添加</a>" } }); else return View("Prompt", new Prompt() { Title = "修改角色失败", Message = "失败原因:"+ _resp.Message, Buttons = new List<string>() { "<a href=/"" + Url.Action("Index", "Role") + "/" class=/"btn btn-default/">角色管理</a>", "<a href=/"" + Url.Action("Modify", "Role", new { id = role.RoleID }) + "/" class=/"btn btn-default/">返回</a>"} }); } else return View(role); }6、删除角色
在控制器中添加Modify方法。
/// <summary> /// 删除【Json】 /// </summary> /// <param name="id">RoleID</param> /// <returns></returns> [HttpPost] public JsonResult DeleteJson(int id) { return Json(roleManager.Delete(id)); }角色功能完成,按F5浏览器中预览效果

---------------------------------------------------------------------------------------
代码见:https://ninesky.codeplex.com/SourceControl/latest
代码下载:https://ninesky.codeplex.com 点击SOURCE CODE 点击Download下载源文件。
以上就是本文的全部内容,希望对大家的学习有所帮助,也希望大家多多支持武林网。
新闻热点


疑难解答